Design Considerations
The console radio projects I saw online didn’t appeal to me. They stripped the old radios down to bare wood and then refinished them to look like new. I wanted my old radio to look like an old radio. The software I planned to use allows for physical buttons and/or a touch screen. My radio had no room to tastefully place both a screen and buttons so I opted for a touch screen. I intended to add an amplifier and speakers to the radio cabinet but ultimately went with a Bluetooth transmitter instead. That enables me to listen to the music over my high-end stereo system or on a Bluetooth speaker in my kitchen or elsewhere. I would only need to unplug the transmitter and plug in an amp if I decided to go back to the original plan. I wanted the radio to look benign when off and fun when playing music. I added a multi-color LED strip to the back of the unit. It provides a playful splash of color when the jukebox is running but is not visible when the machine is off. I’m a fan of the steampunk genre but had never done anything along those lines. I thought I might do something with the old vacuum tubes so I ordered some amber 12 volt LEDs. I would figure out the details later.
Finding a Radio to Modify
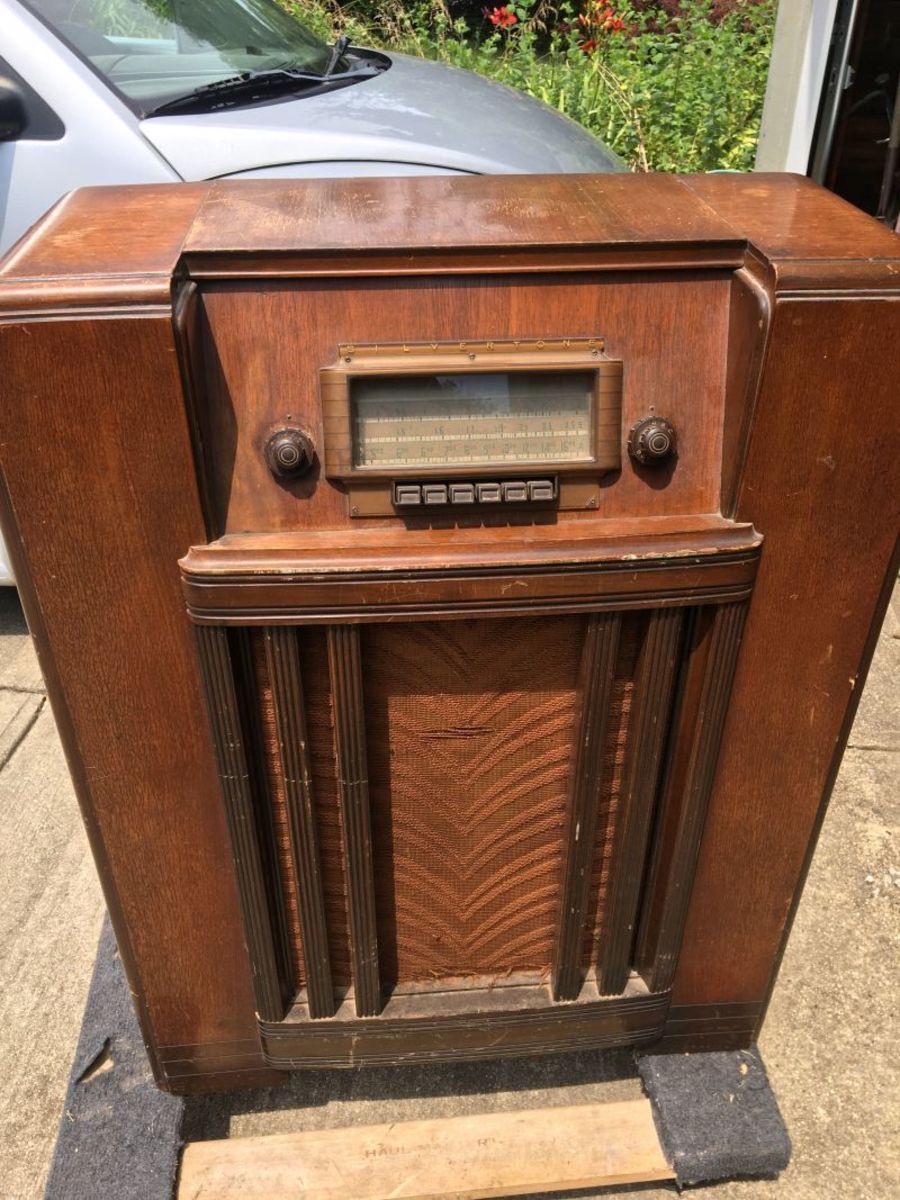
The first step was trying to locate a suitable (non-functioning) radio. I looked at Craigslist and Facebook Marketplace listings daily. There were more than a few available at $150 and up, but I didn’t want to spend that much since there were electronics to buy as well. After about two weeks, I found one listed for $20 and it was just a 15 minute ride from my house. It was exactly what I needed and I immediately called and picked it up.
Working on the Cabinet
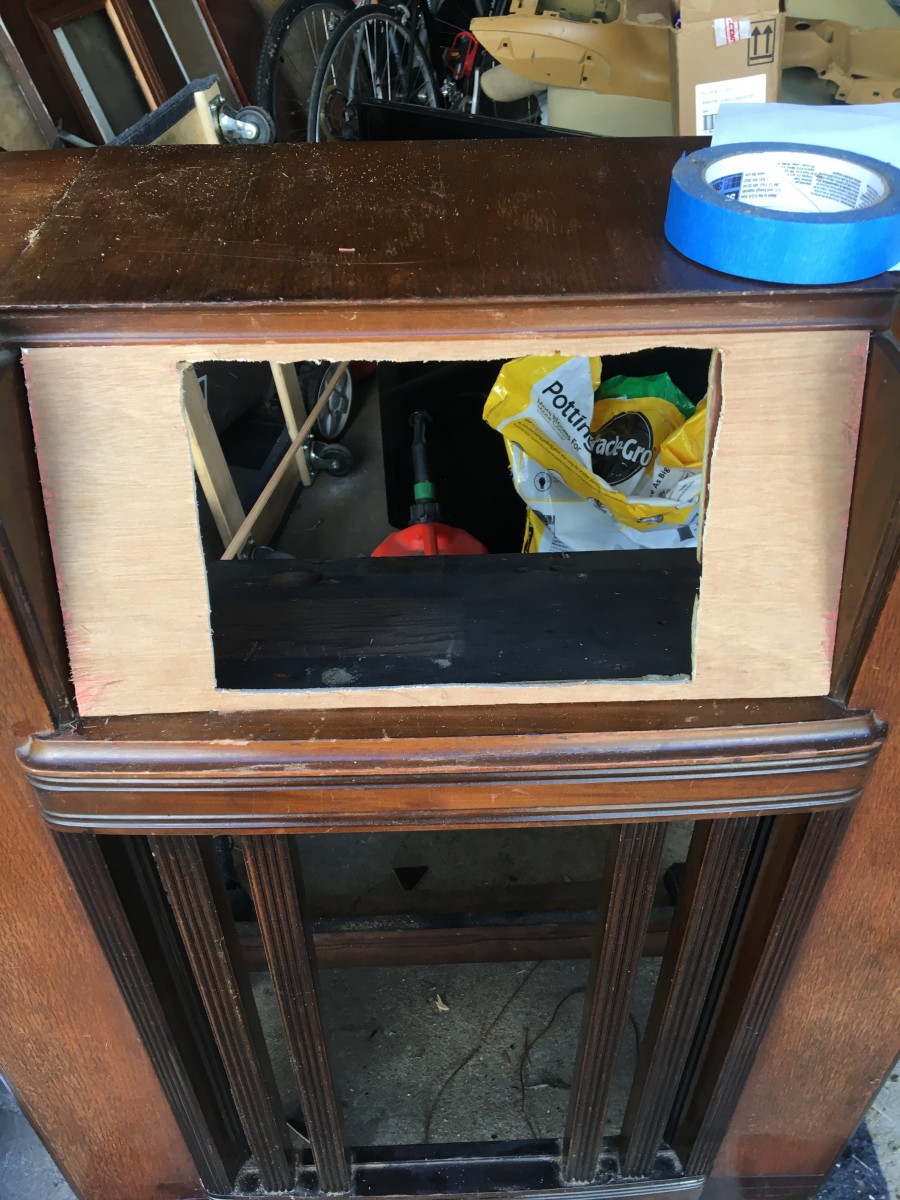
A 10-inch touch screen would replace the physical controls. I removed and saved everything from the wooden cabinet and enlarged the opening with a jigsaw. I was a little loose with my handling of the saw and had to add a piece of plywood to cover up my mistakes. It’s likely that if you are doing this project, your radio will be a different model and the placement of the screen and/or buttons will have to be determined by what you have to work with. The ornate grill cloth was torn and filthy and would not have stood up to washing. I found a shop on eBay (RichmondDesignsInc) that sells period-correct replacements. They didn’t have an exact replacement for my radio, but they had something that was very similar. I think it was well worth the $26. I cleaned the woodwork and touched up some spots where the finish was chipped. A coat of furniture polish was applied and it looked a lot better but still had the patina that I wanted. I have a 3D printer that I used to make the trim around the touch screen, the new old-looking “Silvertone” logo and a few other things. A 3D printer is not required for this project but it can come in handy. I 3D printed brackets on the back of the radio to hold power buttons, USB connections, and audio inputs. These are not required. Fruitbox allows for touch screen buttons to shut down the software and to safely power off the Raspberry Pi. I wanted to keep those functions separate from the jukebox interface to prevent someone from inadvertently turning it off. In retrospect, that was a bit of overkill.
The Electronics and Software
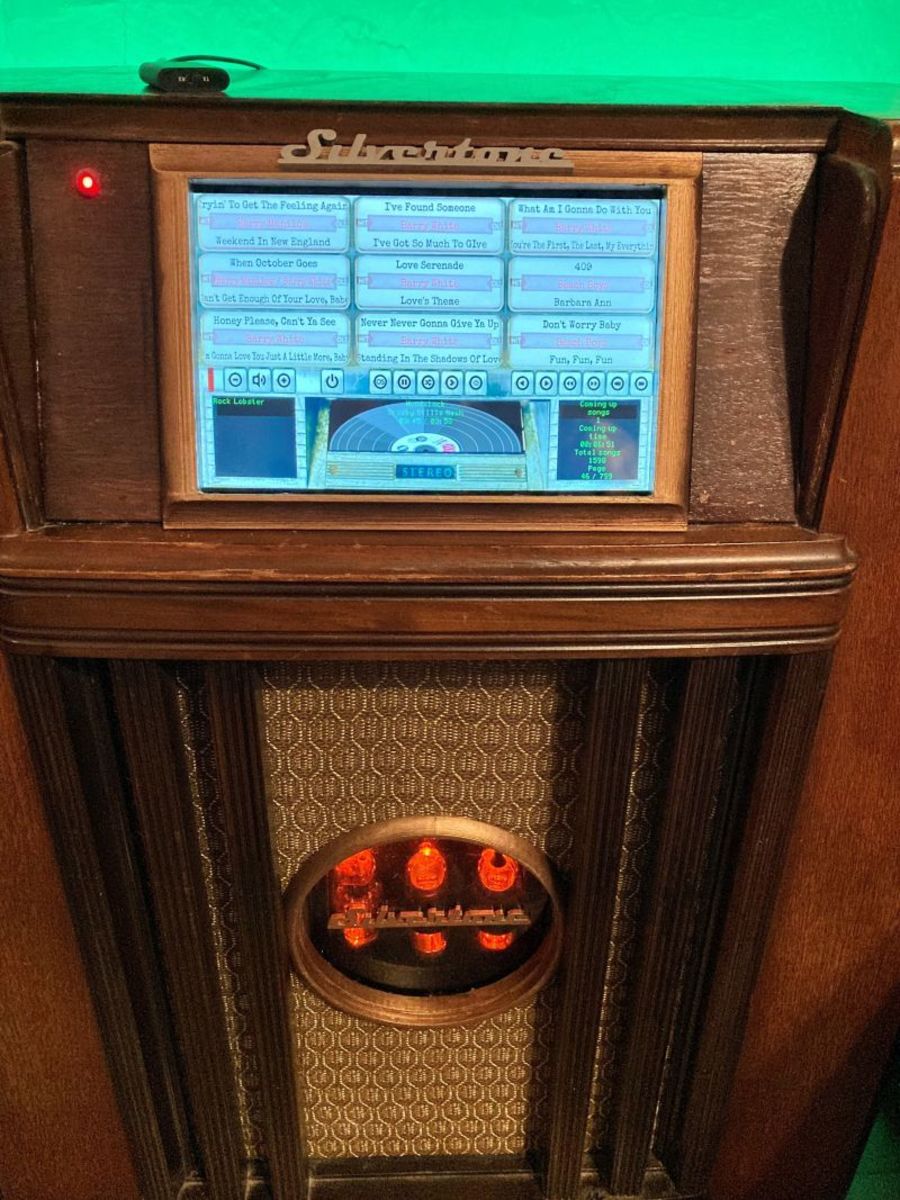
There is a brilliant piece of free software called Fruitbox that handles all the jukebox functionality and runs on a Raspberry Pi. You can use it as is or build your screen however you want. The first image above shows the jukebox in “Song” mode. You can also set it up to show and play full albums. The author provides great software support on his official RaspberryPi.org webpage. I’ve provided links to the software and to the hardware components that I used below.
Computer
I used a Raspberry Pi 3B+, though most versions will work. You will need a micro SD card of any size. If you’re not using the SunFounder touch screen you’ll need a Raspberry Pi power supply, an HDMI cable, some arcade buttons and controller, and a monitor. I paid $25 for my 3B+ on sale at Micro Center. You can normally find them for $35 in most places online. Setting up a Raspberry Pi is easy. You download the operating system from the Raspberry Pi official website to your computer (Mac or PC), burn the image onto a Micro SD card using SD Card Formatter (free download) and then put the card into the Raspberry Pi and plug in the power. Alternatively, you can download the file from the Fruitbox GitHub page that includes the Pi O/S and the Fruitbox software. Once booted, you can configure the network, timezone and keyboard settings. Instructions for this can be found on the RaspberryPi.org website. Fruitbox will use keyboard keys by default so it’s not necessary to have arcade buttons or a touch screen on hand to test the functionality. Any wired or wireless USB keyboard will work. Once the Pi is configured and Fruitbox is installed and configured, a keyboard is no longer required.
Touch Screen
The SunFounder 10 inch model is specifically made to work with Raspberry Pi. The Raspberry Pi mounts to the back of the screen so no separate power supply is necessary as it gets power from the screen. The screen comes with its own power supply and HDMI cable. I am super impressed with this touch screen. It comes with everything you need to attach and connect the Raspberry Pi and works right out of the box. Setting it up to work with the Fruitbox software is detailed in the Fruitbox Userguide.
The HiFi Digital Audio Card (Optional but Recommended)
The InnoMaker Raspberry Pi HiFi DAC Hat device plugs into and sits on top of the Raspberry Pi, which is why it is called a hat. It delivers a clear, robust sound and doesn’t require external power. This isn’t completely necessary but well worth it as it is far superior to the Pi’s onboard sound chip. The instructions for this included a warning that it is loud. I kind of shrugged that off as hyperbole. I was using a set of powered computer speakers at the time and they weren’t too loud. I added the DAC hat and almost blew my ears out. It is amazing how powerful this little device is. I highly recommend it.
Bluetooth Transmitter (Optional)
A 1Mii B03 Bluetooth 5.0 Transmitter Receiver is not required if you intend to plug your amp or powered speakers directly into the Raspberry Pi or InnoMaker HiFi DAC. If you do use a Bluetooth transmitter/receiver, make sure it has a switch so you can lock it into transmit mode. I went through a bunch of other ones that automatically switched between the two modes and can be a nightmare to connect. The Raspberry Pi has built-in Bluetooth, but I could not get it to work consistently and when it did, the sound wasn’t very good. A search of this issue showed that I was not alone. Note: If you are going to use this transmitter along with an amplifier hat, don’t power the transmitter through the Pi’s USB port. That causes the Pi to bypass the amp and pass the audio over the USB connection. This was a frustrating lesson to learn.
Arcade Buttons (If Not Using a Touch Screen)
If you plan to set up traditional jukebox buttons rather than using a touch screen, you’ll need a set of arcade buttons and a controller. The Fruitbox software can handle touch screen buttons, manual buttons, or a combination of the two. These buttons are fairly easy to configure but I didn’t have a suitable place to mount them on my radio. I’ve seen where some people have added a box on top of the radio to hold the buttons but I didn’t like the look. I ordered a set and used them when I was setting up and testing my Fruitbox software. Once I decided on a touch screen, these buttons went into my unused hardware drawer to be used in some future project. If you only want to test your Fruitbox installation, a keyboard will fit the bill.
Software Steps
Download and Install RPI-Fruitbox using the files and instructions on this site: https://github.com/chundermike/rpi-fruitbox For assistance with any aspect of Fruitbox, go to: https://www.raspberrypi.org/forums/viewtopic.php?t=188723 The author of the Fruitbox software and experienced users will answer your questions. It’s a great online community.
Add-ons
To add a power status light for the Raspberry Pi: https://howchoo.com/g/ytzjyzy4m2e/build-a-simple-raspberry-pi-led-power-status-indicator To add a physical button to safely power off the Raspberry Pi: https://howchoo.com/g/mwnlytk3zmm/how-to-add-a-power-button-to-your-raspberry-pi Note: If you’re using the Innomaker DAC Hat and want to add the shutdown button as shown in the HowChoo article, you’ll need to use a different pin for the “Listen-for-Shutdown” script. The DAC uses pin 5 and the conflict will prevent the amplifier from working.
Setting Up Multiple USB Drives
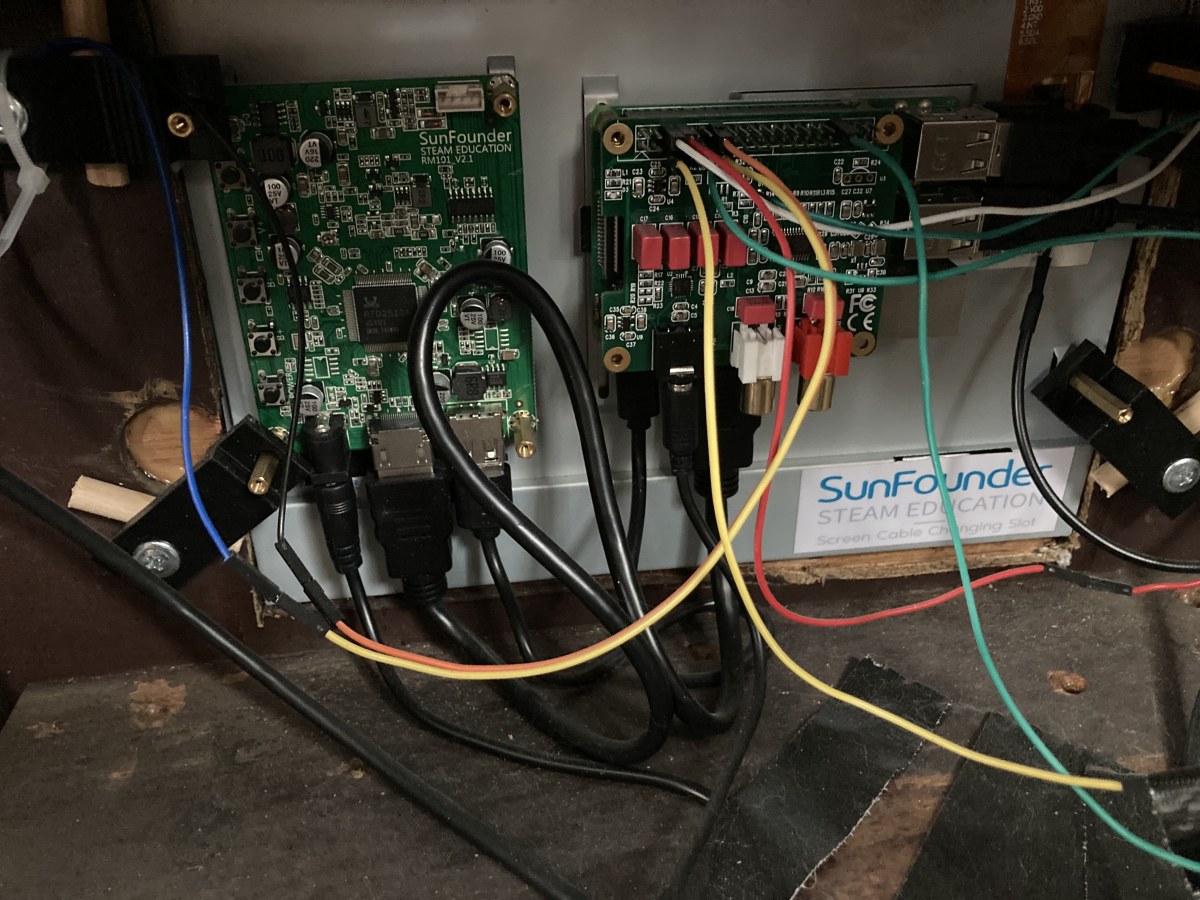
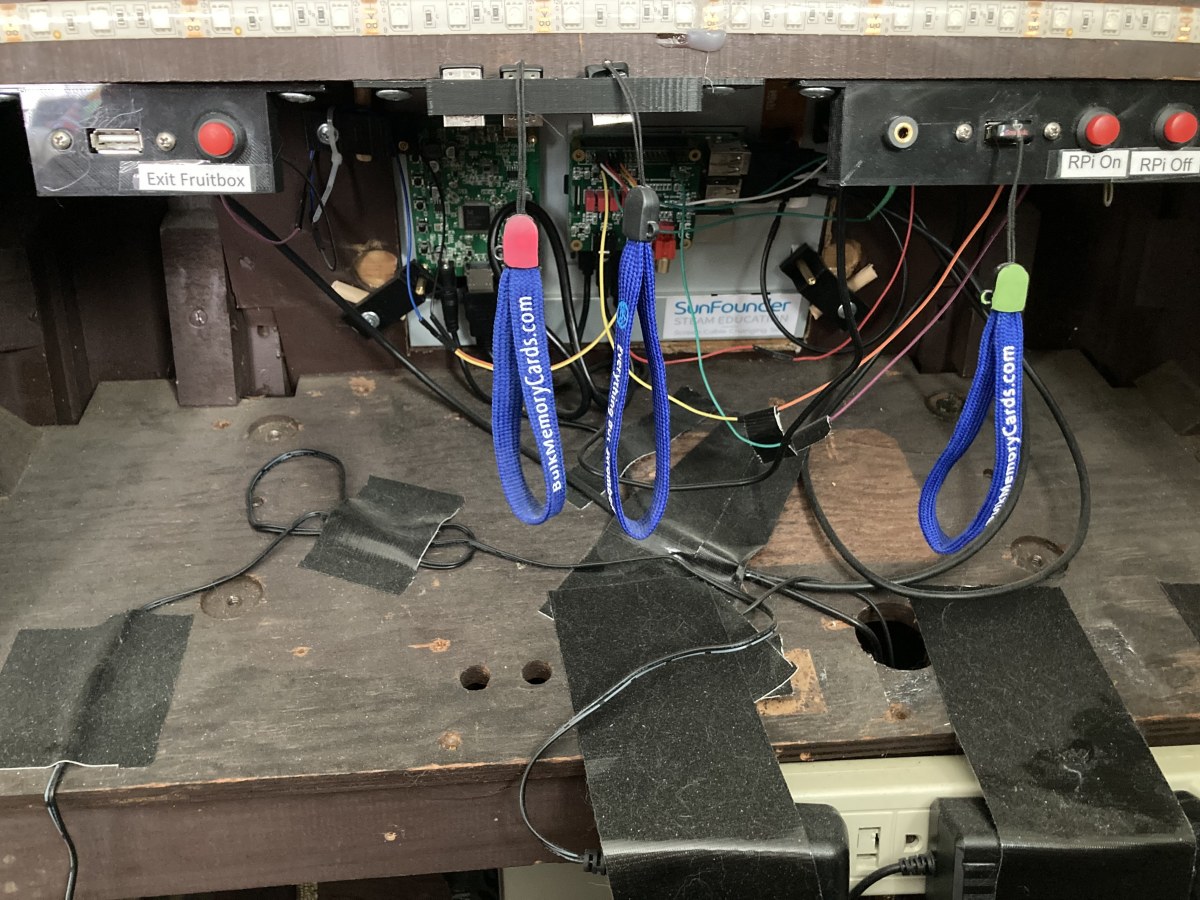
I’ve set up my jukebox to look for the music database and MP3 files on a USB drive. I have four different USB drives set up with different music, different screen skins, and different modes (song mode or album mode). In essence, each USB is a unique version of a jukebox. Depending on which USB drive is plugged in when I start the Raspberry Pi, I have Old Radio Shows from the 1930s and 40s, popular music from the 50s to today in album mode, classical music, opera, and Broadway shows in album mode, or all popular music in song mode. You can configure Fruitbox to start playing random songs after X seconds of inactivity. With over 2,200 songs on my jukebox, it’s pretty cool when songs you haven’t heard for a long time come up. Sometimes it makes me laugh like when I hear Glenn Miller, followed by Black Sabbath, followed by Taylor Swift. The user guide in the installed package and on the GitHub page will tell you how to have the Raspberry Pi automatically mount the USB drive at start up. Creating your own skins can be fun but the documentation for that isn’t highly detailed. It is, however, very versatile and allows you to create skins limited only by your imagination. After fumbling around for awhile I figured out how to make my own screens. I’ve made an old time radio dial, a Forbidden Planet themed screen (see video below) and a few others. The downloaded software includes a variety of different screens that you can choose from and that’s likely all you’ll need. The wires in the above picture are for adding physical buttons that I didn’t want to have on the touch screen. I put buttons on the back of the radio to stop the Fruitbox software and safely shutdown the Raspberry Pi. Both of those functions could be easily handled by virtual buttons, but I didn’t want users to accidentally turn things off. Other wires connect to a status LED on the front of the radio. The USB extensions and input jack make it easier to plug in accessories but are not necessary. You could just as well plug things directly into the Raspberry Pi. I added them so I wouldn’t have to reach into the back of the radio when I wanted to connect a keyboard or other device. Starting from the left:
A USB port that is connected to the Raspberry Pi. It can be used for a keyboard, or any other suitable peripheral, or can be used to power any 5 volt accessory. A button to cause Fruitbox software to exit to the operating system. A holder for USB drives that aren’t currently being used. I have different sets of music and skins on each one. An audio jack. I use it to plug in a Bluetooth transmitter, but it can be used to connect to and amp or stereo system. A USB port for plugging in whichever MP3 collection and screen skin that you want. A button to power the Raspberry Pi up after it has been powered down. A button to safely power the Raspberry Pi down.
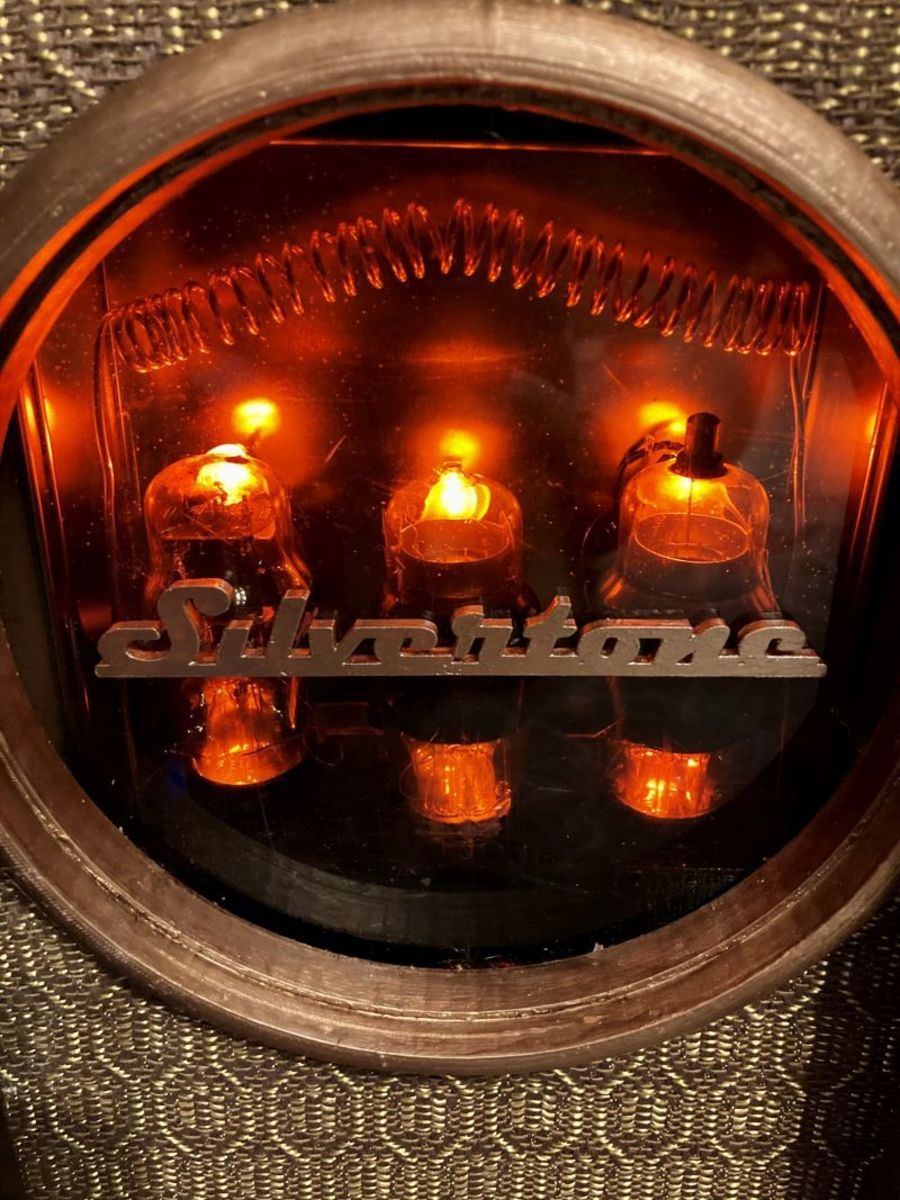
If there is interest in the design files I created for the inputs and outputs, leave a comment and I’ll post them on Thingiverse. I added an LED strip to the perimeter of the back of the radio so it would cast a glow on the wall behind it. Originally I had it set to react to the music and that was pretty cool. But I decided to remove the powered computer speakers that I had put inside the cabinet temporarily and added a Bluetooth transmitter so I could broadcast the music to my living room stereo system. The downside was that the microphone that is attached to the LED strip doesn’t pick up the sound as well as it did when speakers were in the cabinet. The result was that the pulsating lights were significantly less dramatic. Additionally, I had removed the original speaker to let the sound from the computer speakers out and the light from the LEDs shown through the grill cloth. I decided to cut a window where the original speaker had been and lit the old vacuum tubes with amber LEDs to give them a warm and comforting glow. I covered the hole with some acrylic that I had lying around and I am very happy with the results. I 3D printed a trim ring to fit inside the speaker hole and added a 3D printed Silvertone logo.The coiled copper wire was for added effect. The reflective wall behind the tubes is an empty cookie tin from Christmas.
Update May 2022
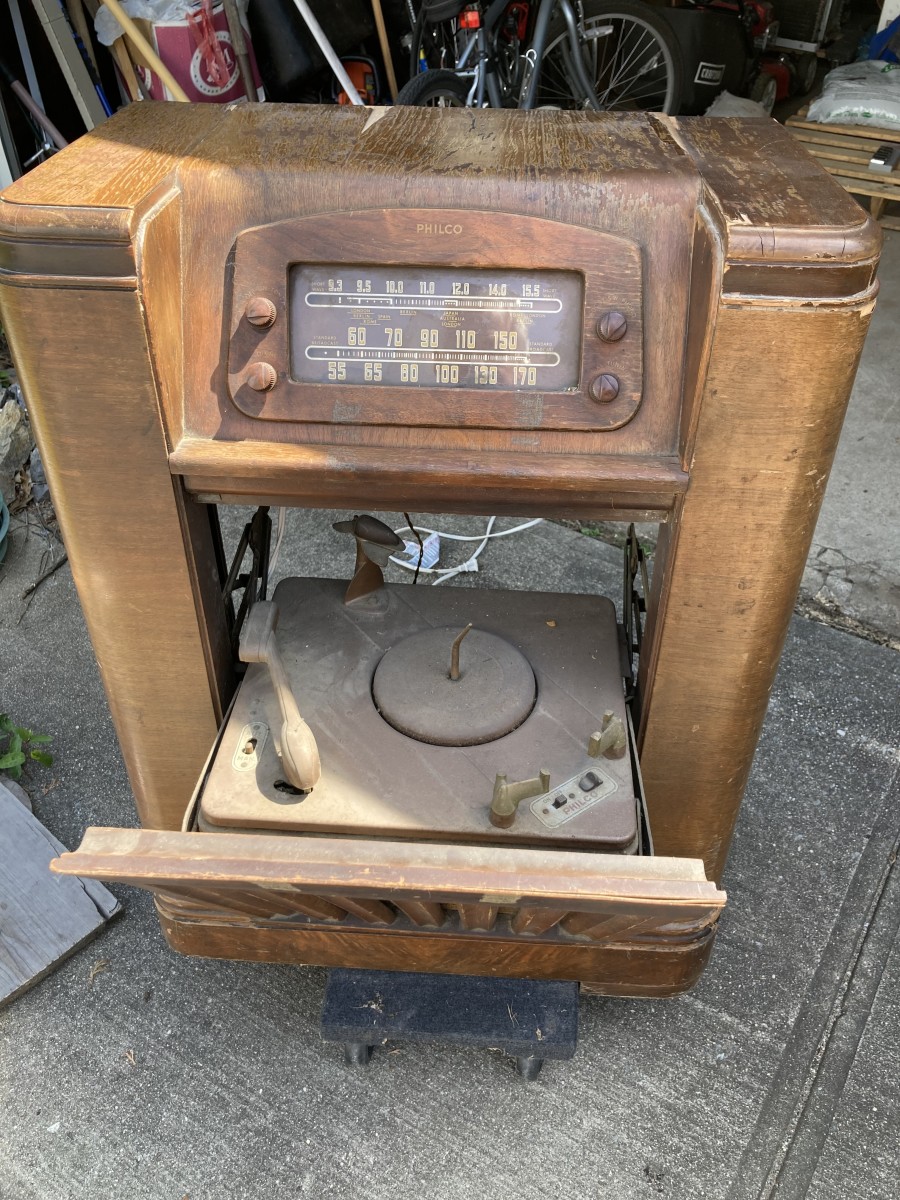
Due to the worldwide chip shortage, Raspberry Pi’s are not available unless you want to pay scalper’s ridiculous prices. I suggest that you don’t encourage these profiteers. Wait until they’re available again from legitimate vendors. My sister-in-law saw my jukebox and asked me to make one for her. I had an extra Raspberry Pi 3B+ laying around so I started a new project. I found a 1946 Philco radio/record player locally and that became the basis for my new project. This radio was in much worse shape than my first one so I wasn’t able to preserve the original patina and still make it presentable. There were chunks of veneer missing that I filled with Bondo (putty) and sanded flush. I had to fabricate a missing leg on one side. A few coats of paint covered the repair work. I opted to forego the physical buttons for shutting down the software and powering off the Raspberry Pi and instead used a touch screen button that handles both functions. The edge-lit acrylic sign on top of the jukebox was made with a diamond drag bit on a CNC machine.
Conclusion
This was a fun, rewarding, and useful project. Everyone who sees it loves it. I would suggest setting up the Raspberry Pi and Fruitbox software before you start trying to incorporate it into an old radio or custom made cabinet. There is a bit of a learning curve, especially if you haven’t used Linux or worked with a Raspberry Pi before, but it’s not daunting. The big plus is that it is a widely supported platform and there is an enormous amount of help available. Google searches will answer just about any question you have. Questions about Fruitbox specifically will be answered on the “fruitbox MP3 jukebox” forum on RaspberryPi.org. I’ll answer any questions that I can. This content is accurate and true to the best of the author’s knowledge and is not meant to substitute for formal and individualized advice from a qualified professional. © 2021 Bill Yovino